
Choose Your Own Beading Adventure with Twisted Herringbone Ropes
 |
|
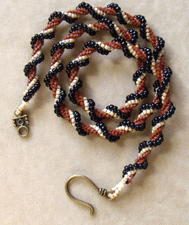
Oh, how I love twisted herringbone stitch ropes! My first attempt at these essential beaded ropes was not so pretty: made with size 15 beads (what was I thinking?), there were more threads showing on that little bit of beadwork than I care to admit now. But once I got the hang of the technique, I fell completely head over heels for that sweet, subtle twisted texture that you just can’t get from beaded ropes made with other beading stitches.
Fast forward to 2009, and a kit I purchased from Leslie Frazier showed me the most marvelous way to begin a twisted herringbone rope! Simple, secure, and very little thread showing. With this technique, the twists in the herringbone rope start to show up after just a couple of rounds, and the variations that can be made using different sizes of seed beads in different combinations are just about endless. For me, twisted herringbone stitch is really this beaded rope lover’s dream!
Ready to add a little twist to your next beaded pendant or beaded necklace making project? Check out a few ideas and tips for stitching up some fun twisted herringbone beaded ropes!
Twisted Herringbone Ropes With Seed Beads
The first thing to do before you start playing with your twisted herringbone stitch is to dig through your bead stash and pull out a variety of sizes: 15, 11, cylinder beads, 8, and drop beads are a great place to start with these variations. Coordinate colors, or mix them up and experiment with colors that you don’t usually use. If you need an excuse to go bead shopping and round your collection of larger seed beads, this is the reason to do it!
Each of these variations on twisted herringbone stitch ropes will begin with a basic ladder-stitched base:
 |
|
Pick up 4 beads, and pass through the first two beads you picked up again. The beads should line up into a set of two 2-bead stacks. Pass down through the second two beads you added.
Pick up two more beads, and pass through the two beads you exited at the end of the last step. Pass through the 2 beads you just added to add a third stack of 2 beads. Repeat one more time for a total of four 2-bead stacks.
Pass through the first two beads you added at the beginning of the base, and then through the next stack of 2 beads to form a ring. From here, you’ll begin your twisted herringbone adventure!
Choose Your Seed Beads
The great part about playing with these variations on twisted herringbone rope is that you can mix and match your seed beads any way you want! If you’ve got a special tube of size 8 seed beads that have been languishing in your stash, now is the time to take them out and show them some love.
You can also substitute triangle beads or tiny cubes for any of the size 8 seed beads in any of these variations for a unique twist on tubular herringbone ropes.
 |
Cylinder bead-round bead variation: This is the easiest way to bring some texture into your twisted herringbone rope. All you have to do is pair a size 11 cylinder bead with any other size 11 round seed bead.
Your base for this variation should consist of two 2-bead stacks of cylinder beads, and two 2-bead stacks of size 11 round beads. (Four 2-bead stacks total.) After joining them into a ring, you should be exiting from the top of one set of cylinder beads. Pick up 4 cylinder beads, and pass down through the next 2 cylinder beads in the base. Pass up through the next set of size 11 round seed beads. Pick up 4 size 11 round beads and pass down through the next stack of size 11 round beads. To start your twist, pass up through the next 2 cylinder beads, plus the first 3 cylinder beads that you added in the first round. Pick up 2 cylinder beads, pass down through 1 cylinder bead. Pass up through the first 3 round beads, pick up 2 round beads, pass down through 1 round bead. Pass up through the last 3 cylinder beads, and repeat. You’ll see your twist happen in just a few rounds! |
|
 |
Size 11 and size 8 twist variation. For this variation, you’ll start your ladder with four 2-bead stacks of size 11 round beads. For your first round, add 4 size 11 beads and 4 size 8 beads. To start your twist, pass up through the first two size 11 beads in the base, and the next 3 size 11 seed beads. *Add 2 size 11 seed beads and pass down through one bead.
Pass up through the last 3 size 8 beads (skipping the beads in the base), and pick up 2 size 8 seed beads. Pass down through one size 8 bead. Pass up through the last 3 size 11 beads, and repeat from *. Using two alternating sizes of seed beads gives you a gentle, rolling twist for your herringbone rope. |
|
 |
Cylinder-round-round twist variation. For this variation on twisted herringbone rope, you’ll use size 11 cylinder beads, size 11 round beads, and size 8 round beads. Follow the instructions for the cylinder bead-round bead variation, but make your base using six 2-bead stacks (two stacks of each size/type of seed bead.) Add four beads of each size/type in the first round, then follow the same instructions for starting your twist.
This is a heavier, thicker twisted herringbone rope that holds up well for lots of embellishment, or for larger beaded pendants. It gives the look of thick ribbons wrapped around a skinny center. |
Tips for Stitching Twisted Herringbone Ropes
Just like any beaded rope, sometimes it’s hard to get a grip on things until you have the first couple of inches completed. To that end, I have a couple of suggestions for keeping it together while you get your herringbone ropes started:
1. Keep your tension snug. You don’t have to pull too tightly, but before you pass up through your next three seed beads, make sure you snug up that working thread so that your columns of seed beads twist and lay against each other nicely. My trick for maintaining tension is to give the working thread a little tug, then secure it by wrapping it once or twice around the index finger of my non-dominant (left) hand. If you can see thread between your columns of seed beads, pick up the pair of beads from the previous stitch and give them a little pull to make that thread disappear.
2. Use short lengths of thread. Weaving in countless thread ends isn’t my favorite part of any bead-weaving project, but using short lengths of thread when making my twisted herringbone ropes means less tangles and more beading. Because these techniques eat up thread pretty fast, you’ll progress pretty quickly through the first couple of inches on these twisted herringbone ropes. Shorter threads also make it easier for me to maintain tension during those crucial first couple of inches, too. And if I have to spend a little extra time weaving in all those thread ends, the finished twisted herringbone rope will be well worth it!
 |
|
Learn more about herringbone stitch and all its uses with bead expert Jean Campbell in Jean Campbell’s Best Beading Workshops: Global Designs. This instant-download video takes you through four beaded bracelet projects inspired by world cultures. Best of all, you can save big (for a limited time) when you buy any two video downloads for just $5.99 in the Beading Daily Shop! Treat yourself to a little something this holiday season, and stock up on your favorite beading video downloads in the Beading Daily Shop.
Got questions about making twisted herringbone ropes? Ask them here! Leave a comment with your questions, tips, hints, tricks, or advice here on the Beading Daily blog and let’s get inspired to choose our own adventures with twisted herringbone stitch!
Bead Happy,

Jennifer


Join the Conversation!